How to Balance Voiceover and Background Music with Audio Ducking

A good mix is one nobody notices when every sound stays in balance. Narration sits clear above music while both support the video without distraction. Getting there depends on 3 steps done in the right order first.

Set levels before using audio ducking to shape voice and music balance. Filmora video editor then helps control music beneath speech with simple settings. Finish with a listening pass to catch what automatic adjustments may miss.
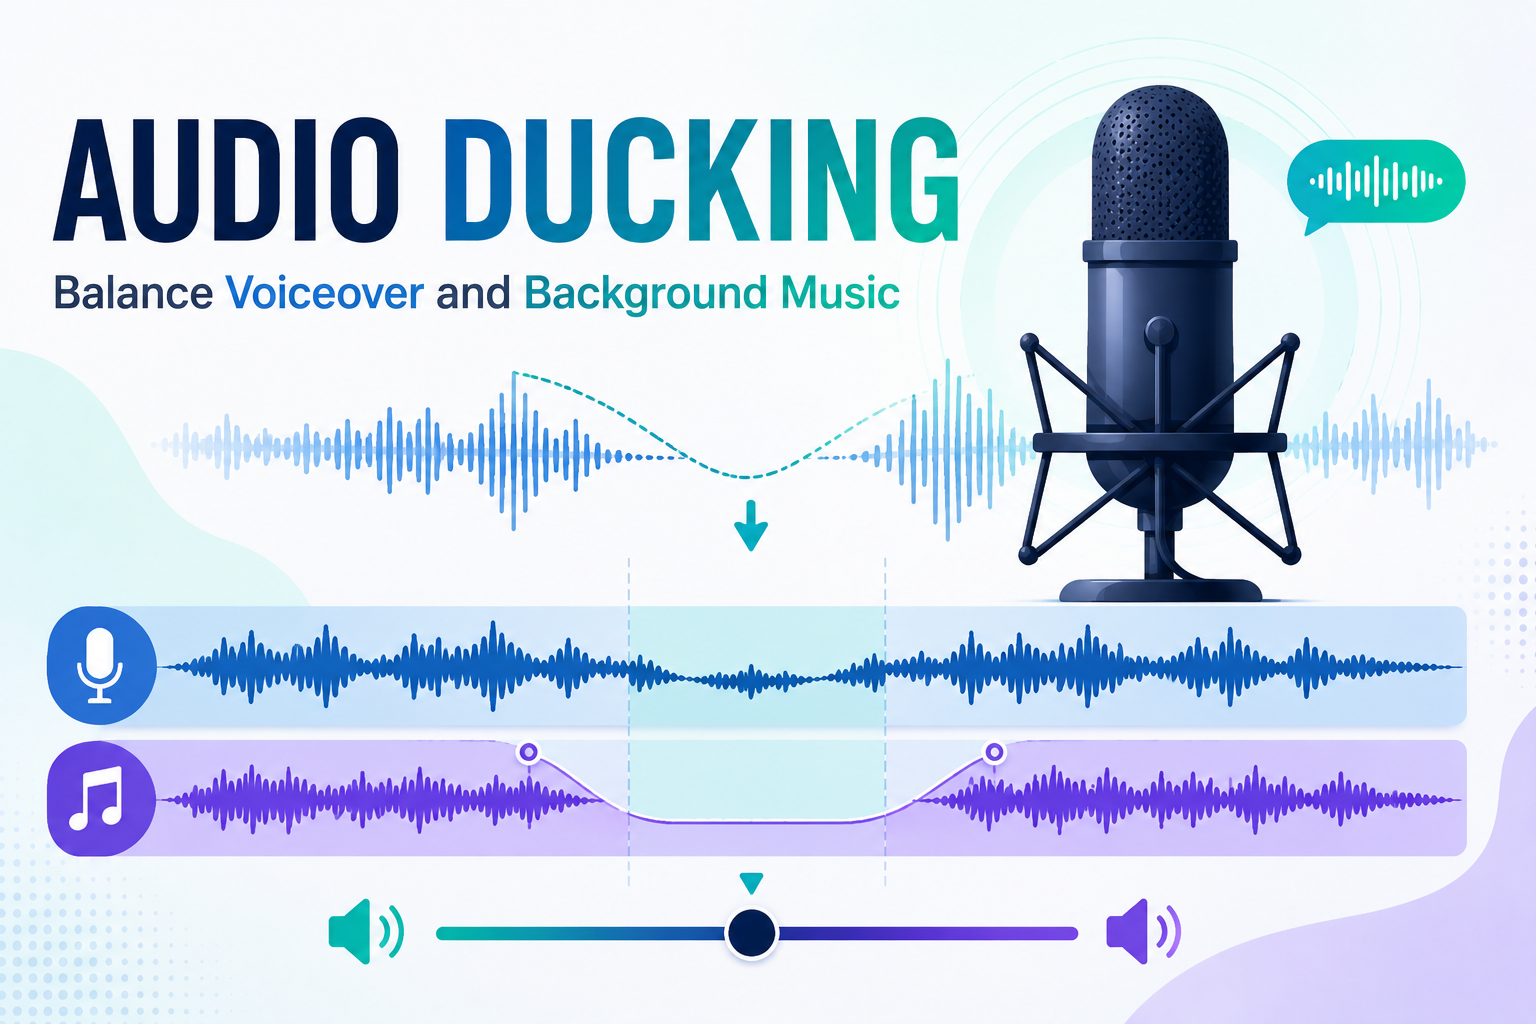
Part 1. Prepare the Voiceover and Music Tracks

Separate voice and music tracks before automatic ducking can control their balance. The table below shows twelve signs that both tracks are prepared well:

Ready for DuckingFix This First
Voice and music sitting on separate audio tracksBoth recordings sharing a single row on the timeline
Narration that is clear with the music mutedA voice that is muddy or hard to follow on its own
Hiss and room noise already dealt withBackground hum still audible underneath the words
A voiceover you have listened to aloneA voice you have only heard beneath the music

Preparing the voiceover first saves time when you begin mixing both tracks. Ducking changes volume balance but cannot repair a muddy voice recording itself.
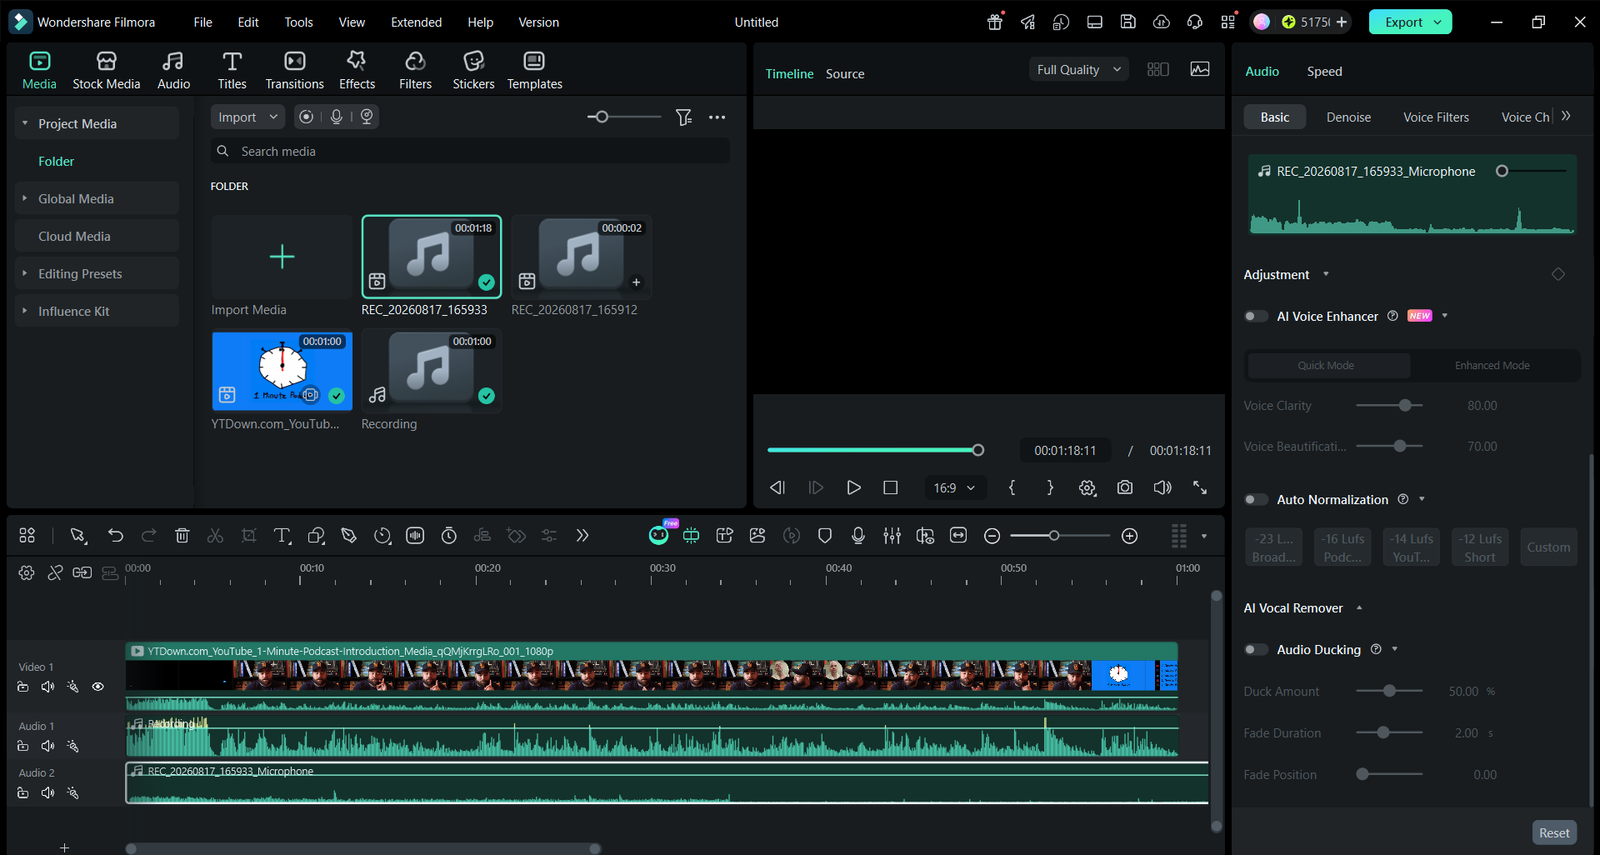
Clear narration gives the music enough space without hiding important spoken words. Check both tracks before moving ahead with the main ducking process next. For recordings with unwanted dead space, Filmora Silence Detection can help identify sections that may need removal before mixing.

Part 2. Set the Basic Volume Levels First

Understanding “what is audio ducking?” starts with setting sensible voice and music levels. Now, look at the table below for useful target levels before ducking:

What to SetWhere to Aim
Voiceover PeaksAround -6 dB, staying below zero throughout
Voiceover ConsistencyOne steady level, using normalization if it wanders
Music Starting LevelRoughly 18 to 20 decibels below the voice
The Gap Between ThemAt least 20 dB, which is the accessibility guideline
Minimum Safe GapAdjust by listening because no universal 15 dB minimum prevents music from masking speech

The 20 dB gap follows accessibility guidance for speech over background audio. This target helps listeners hear spoken words without music masking important details.

Part 3. Enable Audio Ducking in Filmora

With levels set, Filmora audio ducking helps balance music beneath spoken voice. Follow the steps below to configure ducking and control your audio mix:

Step 1. Select the Voiceover Clip

First, create a new Filmora video editing project. Next, press “Import Media” to add your video and recording clip. Next, drag and drop them over the timeline to start working on. Click the clip you want to hear more clearly.
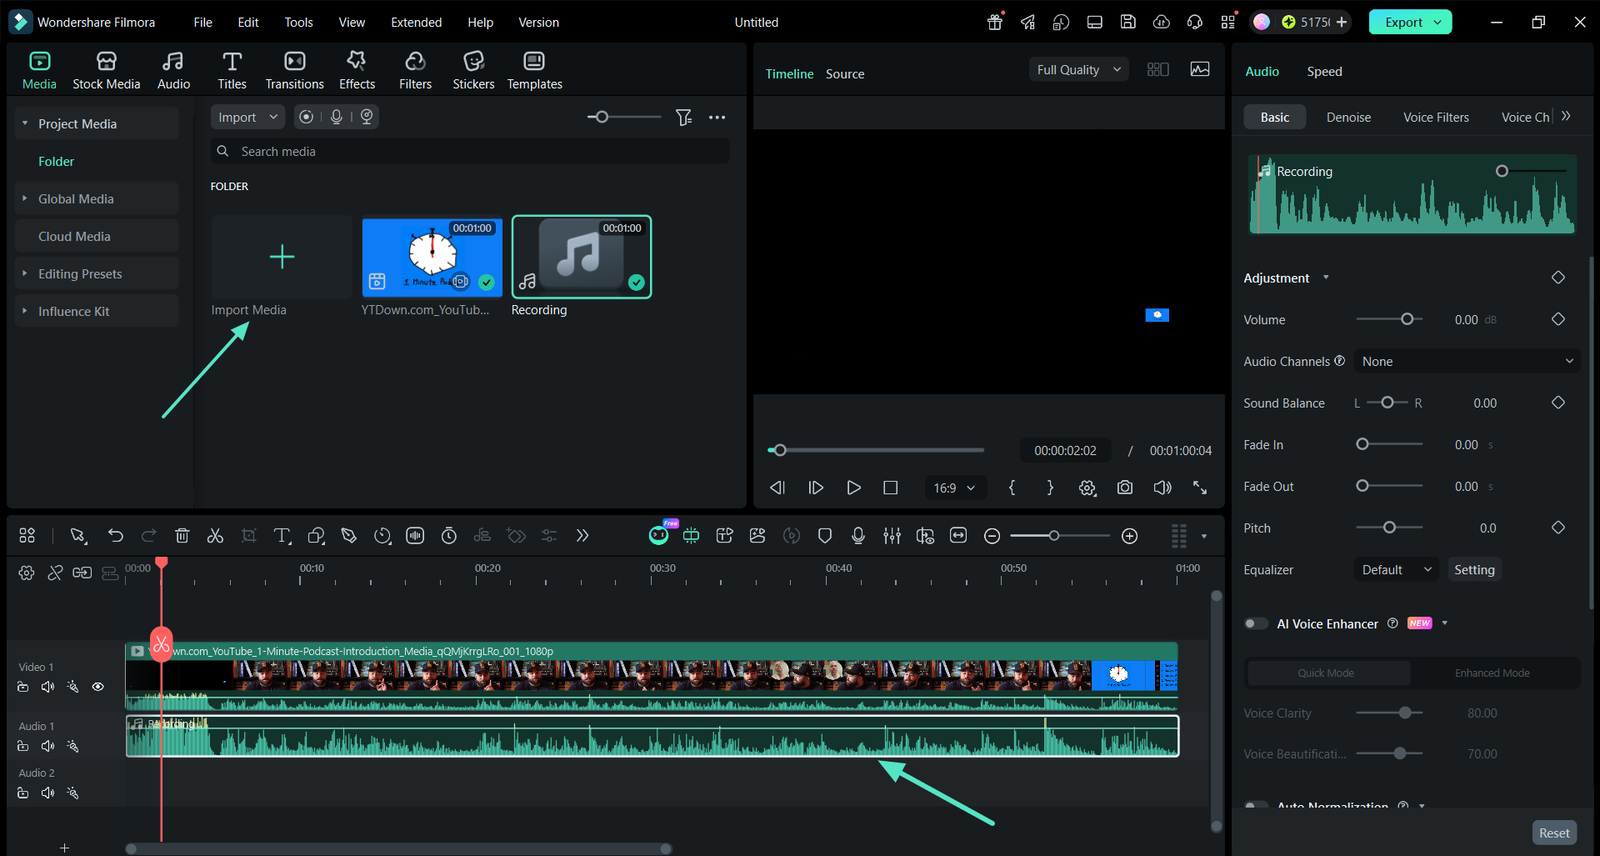
Step 2. Open the Audio Panel and Switch It On

Find the “Audio” tab in the right-side properties panel and turn the “Audio Ducking” toggle on. Several voice clips can be selected together if the narration runs across many pieces.
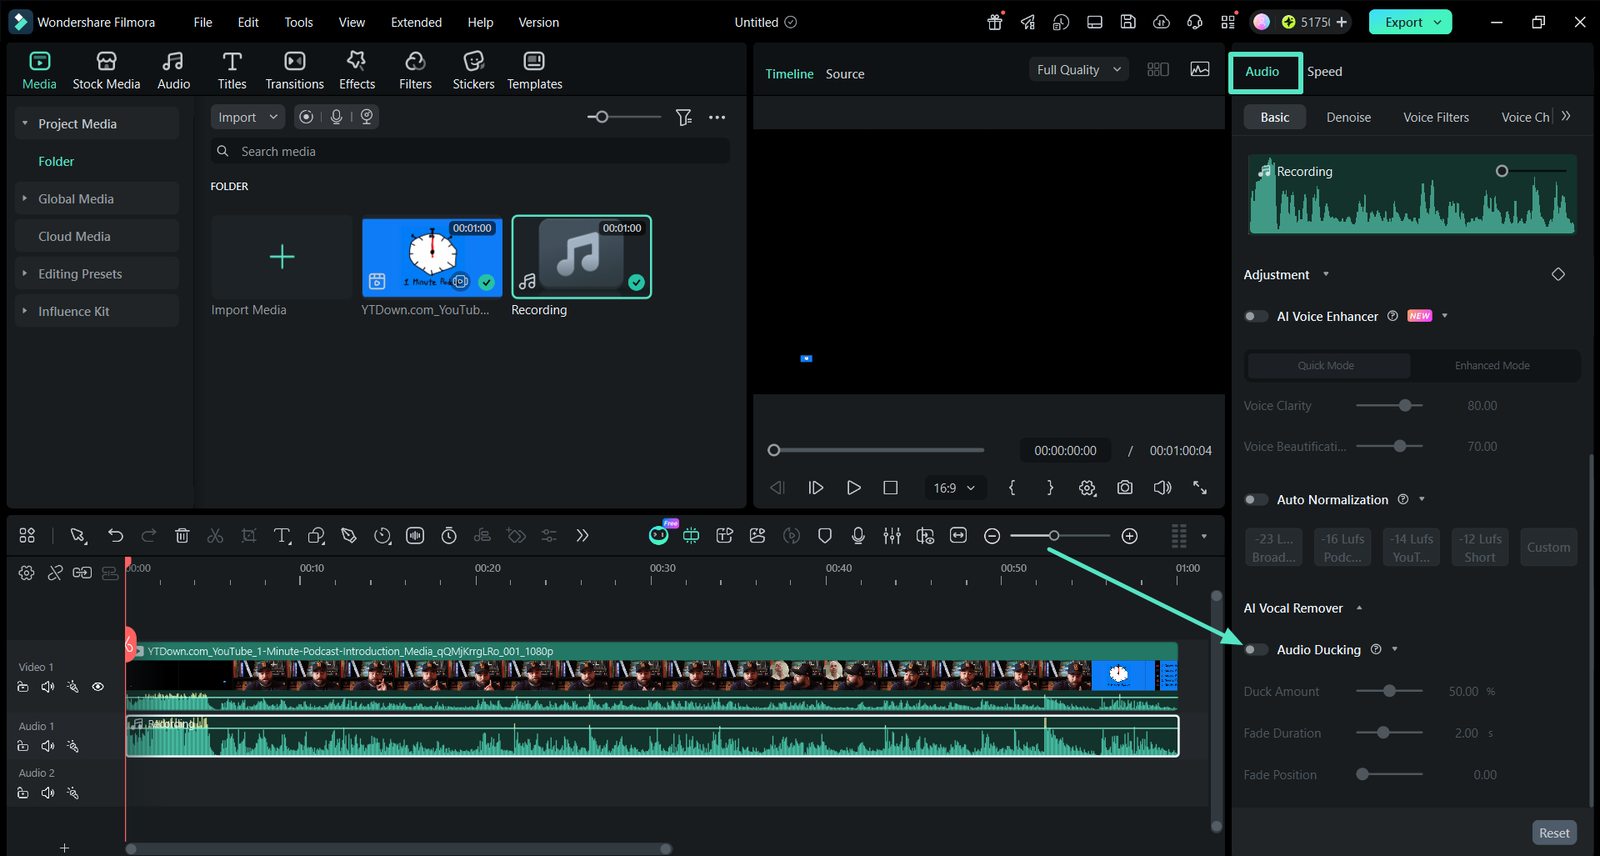
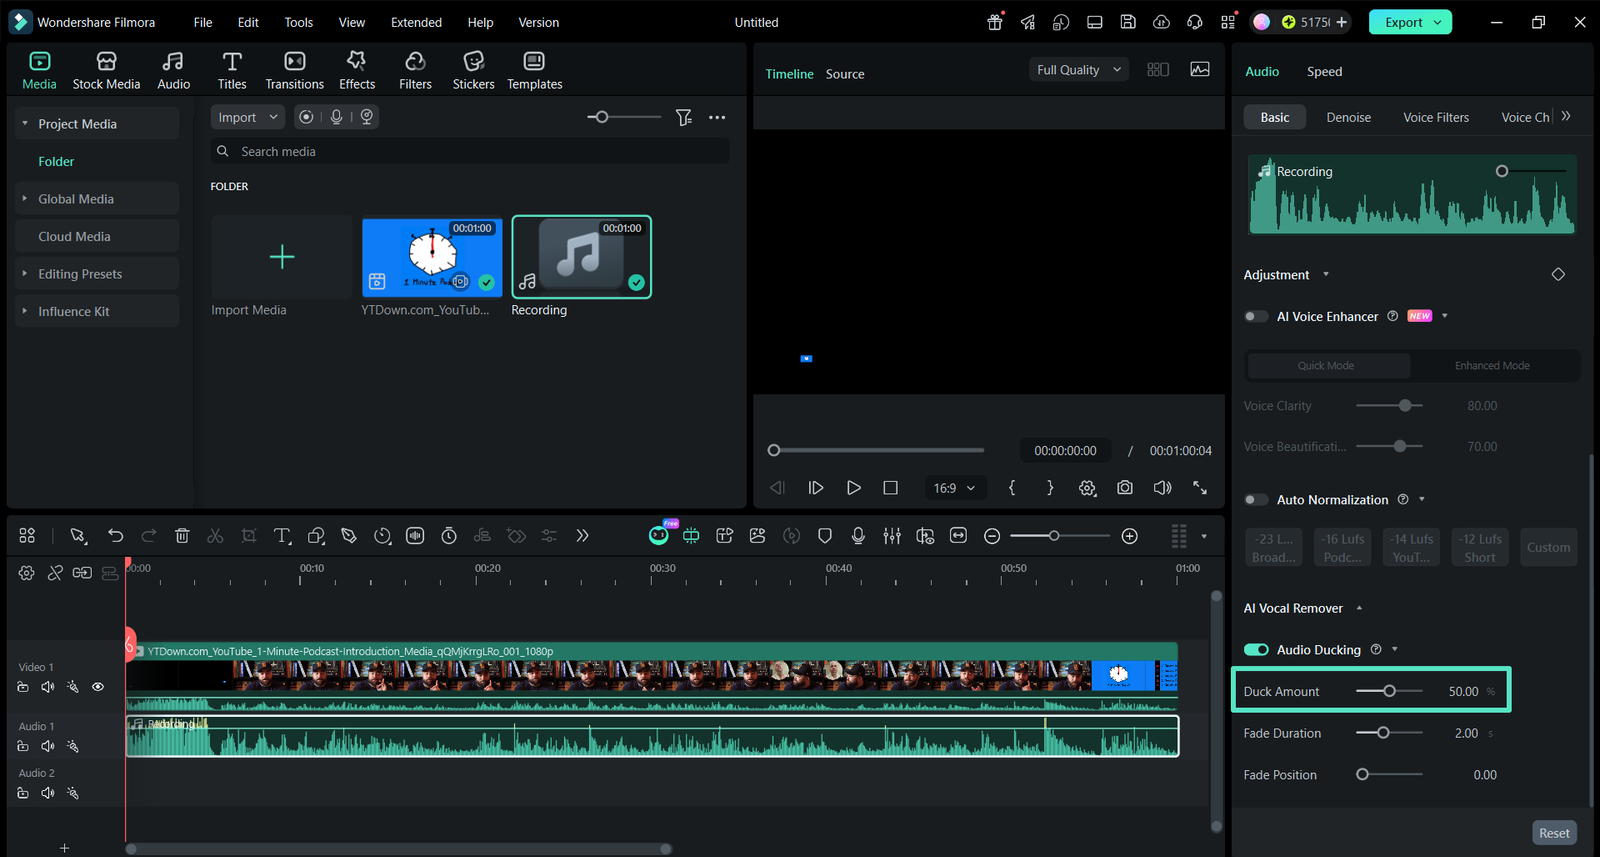
Step 3. Start with a Moderate Duck Amount

The “Duck Amount” slider defaults to 50%, which halves the background level under speech. Keep this level unchanged when your music already sits well below the voice.
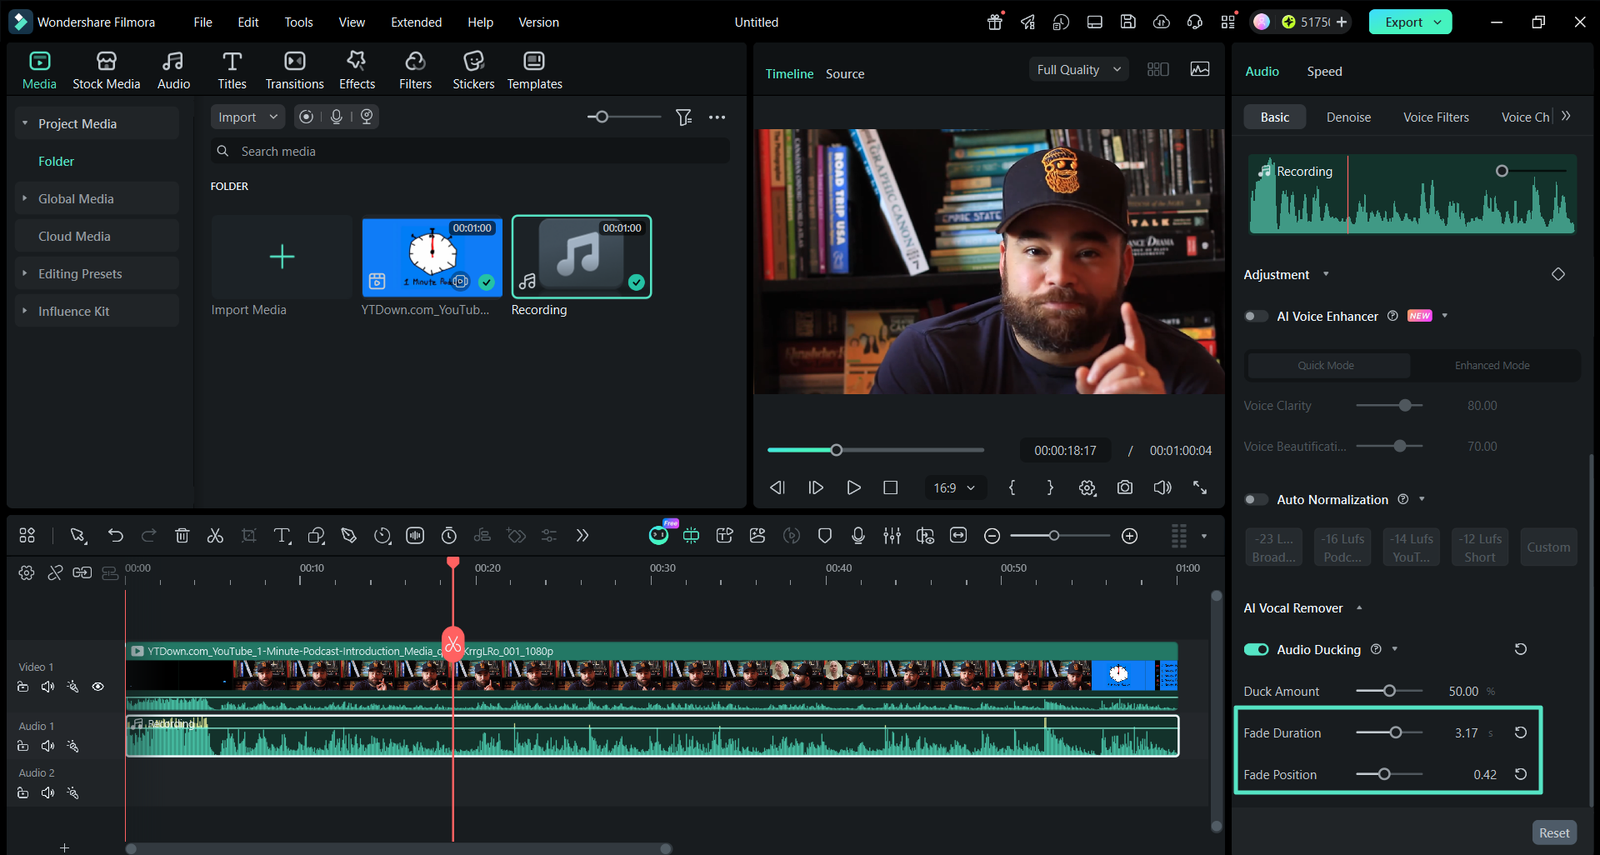
Step 4. Set Fade Position and Fade Duration

Adjust the “Fade Duration” and “Fade Position” sliders to control when music drops and recovers. Longer fades help prevent sudden volume changes around speech.
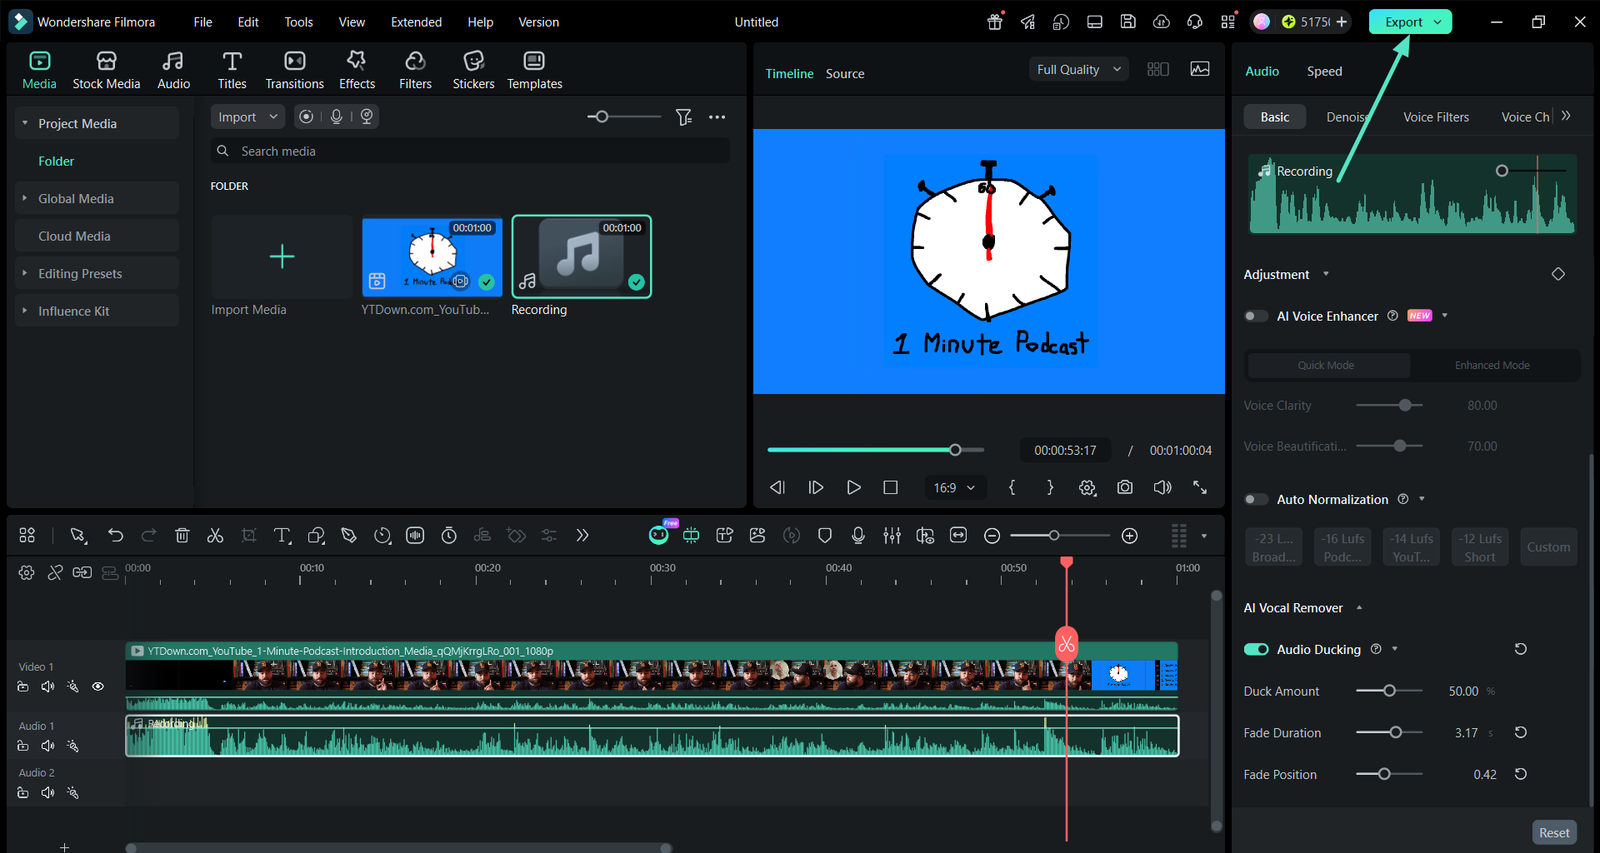
Step 5. Preview a Real Section

After ducking, preview sections with speech and pauses to check the audio balance. The voice should remain clear while the background music stays audible beneath it. Next, press “Export” to save the edited version.
Note: The same controls open from the “Tools > Audio > Adjust audio.” Use whichever route you find faster.

Part 4. Check Music Changes Between Sentences

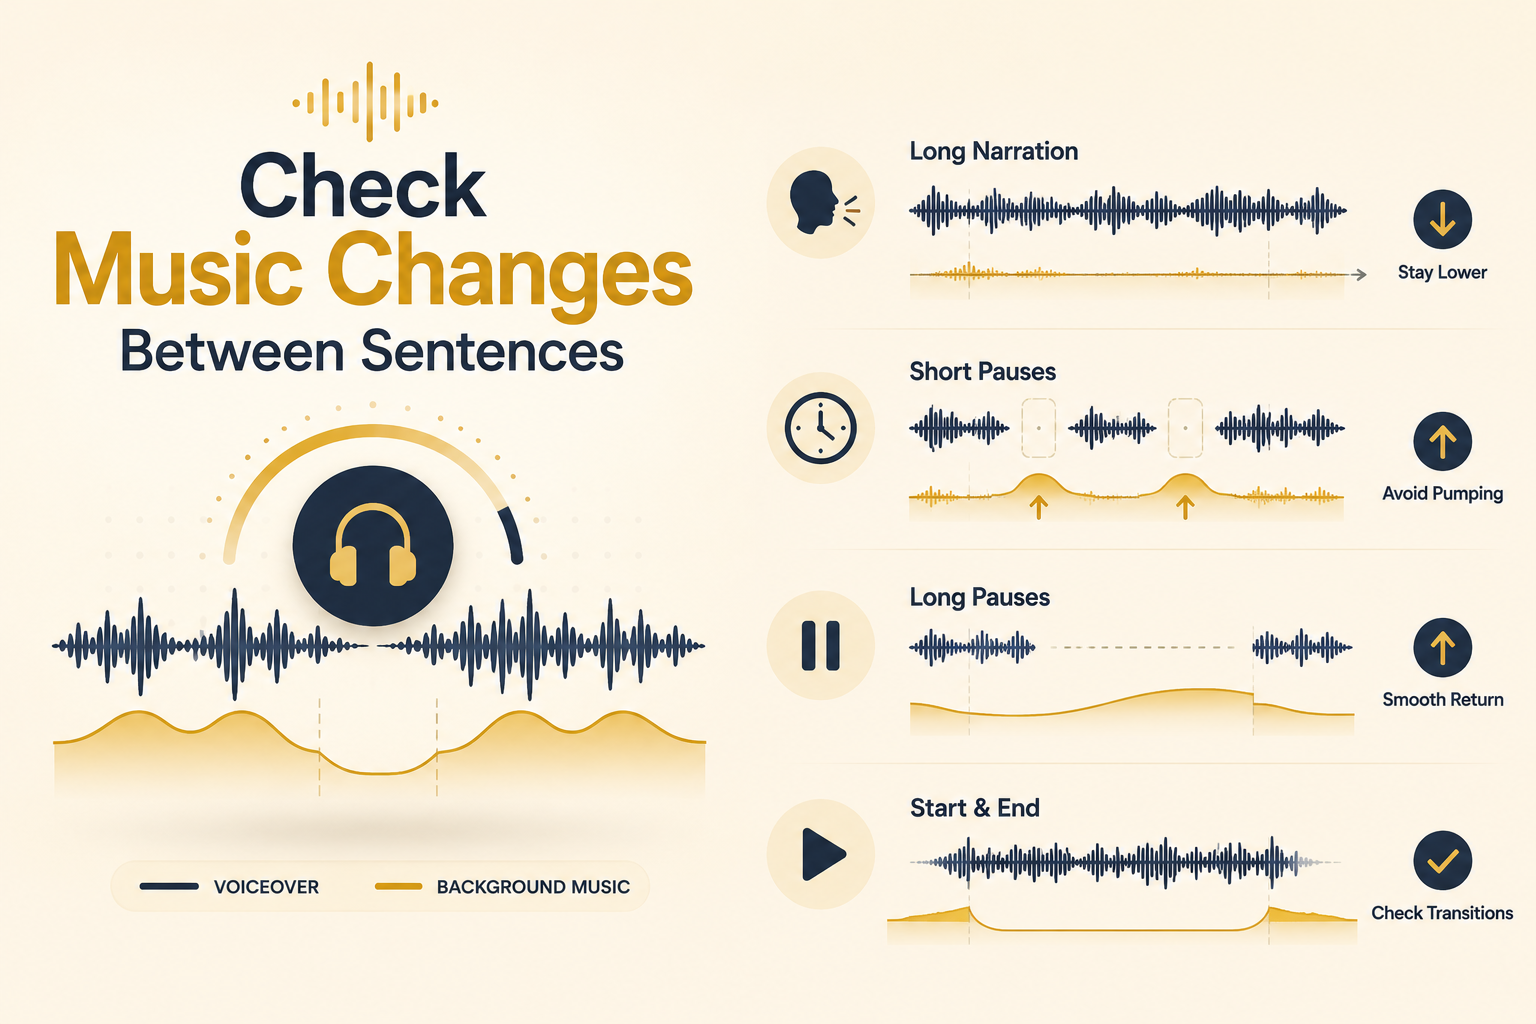
Automatic ducking can make music jump between phrases when speech pauses occur. Let’s explore 4 checks to find these unwanted volume changes during playback.

  • Continuous Narration: Check the music stays reduced through long passages without rising between phrases.
  • Short Pauses: Hear the gaps between sentences where unwanted pumping becomes most noticeable.
  • Long Pauses: Check that the music returns during real breaks when narration has stopped.
  • Start and End: Notice whether opening and closing sentences behave differently from others.
For longer recordings with many pauses, the Silence Detection guide explains how to find and review silent sections before making cuts. A longer fade duration can reduce pumping by preventing music from rising during short pauses.

Part 5. Correct Individual Sections Manually

Some sections need manual control when audio ducking cannot match intent. Look at the table below for moments that need manual adjustments:

SituationWhat to Do Instead
A Musical AccentLift the music for a brief drum hit or musical swell
A Long Silent BreakRaise the music beyond the automatic recovery to fill the space
A Call to ActionLower the music further so the closing message remains clear
A Track That Changes IntensityAdd keyframes across louder sections to maintain a balanced mix
An Emotional MomentLet the music rise where appropriate without masking important speech

Manual changes can support ducking when certain sections need more precise control. Keep these adjustments limited so future ducking changes remain easier to manage.

Part 6. Review the Exported Audio

Review exported audio because editor playback may hide problems within your mix. Check whether automatic ducking keeps voice clear and music balanced after export.

Listen on 2 Different Systems

Headphones reveal fine details, while small speakers expose common audio problems. Phone speakers flatten track differences, making balanced mixes sound too close. Most of your audience will hear the second version through small speakers.

Check 4 Things While It Plays

Confirm every word stays clear and music never disappears from the mix. Check that no volume change arrives with an abrupt or harsh shift. Then check overall loudness, since balanced mixes can remain too quiet.

Conclusion

A balanced mix starts with clear voice levels and controlled background music. Audio ducking then helps manage volume changes while keeping speech easy to hear. Filmora provides useful controls for shaping how music responds during spoken sections. Review the exported audio before publishing to catch volume changes or balance issues.

A good mix is one nobody notices when every sound stays in balance. Narration sits clear above music while both support the video without distraction. Getting there depends on 3 steps done in the right order first.

Set levels before using audio ducking to shape voice and music balance. Filmora video editor then helps control music beneath speech with simple settings. Finish with a listening pass to catch what automatic adjustments may miss.

Part 1. Prepare the Voiceover and Music Tracks

Separate voice and music tracks before automatic ducking can control their balance. The table below shows twelve signs that both tracks are prepared well:

Ready for DuckingFix This First
Voice and music sitting on separate audio tracksBoth recordings sharing a single row on the timeline
Narration that is clear with the music mutedA voice that is muddy or hard to follow on its own
Hiss and room noise already dealt withBackground hum still audible underneath the words
A voiceover you have listened to aloneA voice you have only heard beneath the music

Preparing the voiceover first saves time when you begin mixing both tracks. Ducking changes volume balance but cannot repair a muddy voice recording itself.

Clear narration gives the music enough space without hiding important spoken words. Check both tracks before moving ahead with the main ducking process next. For recordings with unwanted dead space, Filmora Silence Detection can help identify sections that may need removal before mixing.

Part 2. Set the Basic Volume Levels First

Understanding “what is audio ducking?” starts with setting sensible voice and music levels. Now, look at the table below for useful target levels before ducking:

What to SetWhere to Aim
Voiceover PeaksAround -6 dB, staying below zero throughout
Voiceover ConsistencyOne steady level, using normalization if it wanders
Music Starting LevelRoughly 18 to 20 decibels below the voice
The Gap Between ThemAt least 20 dB, which is the accessibility guideline
Minimum Safe GapAdjust by listening because no universal 15 dB minimum prevents music from masking speech

The 20 dB gap follows accessibility guidance for speech over background audio. This target helps listeners hear spoken words without music masking important details.

Part 3. Enable Audio Ducking in Filmora

With levels set, Filmora audio ducking helps balance music beneath spoken voice. Follow the steps below to configure ducking and control your audio mix:

Step 1. Select the Voiceover Clip

First, create a new Filmora video editing project. Next, press “Import Media” to add your video and recording clip. Next, drag and drop them over the timeline to start working on. Click the clip you want to hear more clearly.

Step 2. Open the Audio Panel and Switch It On

Find the “Audio” tab in the right-side properties panel and turn the “Audio Ducking” toggle on. Several voice clips can be selected together if the narration runs across many pieces.

Step 3. Start with a Moderate Duck Amount

The “Duck Amount” slider defaults to 50%, which halves the background level under speech. Keep this level unchanged when your music already sits well below the voice.

Step 4. Set Fade Position and Fade Duration

Adjust the “Fade Duration” and “Fade Position” sliders to control when music drops and recovers. Longer fades help prevent sudden volume changes around speech.

Step 5. Preview a Real Section

After ducking, preview sections with speech and pauses to check the audio balance. The voice should remain clear while the background music stays audible beneath it. Next, press “Export” to save the edited version.

Note: The same controls open from the “Tools > Audio > Adjust audio.” Use whichever route you find faster.

Part 4. Check Music Changes Between Sentences

Automatic ducking can make music jump between phrases when speech pauses occur. Let’s explore 4 checks to find these unwanted volume changes during playback.

  • Continuous Narration: Check the music stays reduced through long passages without rising between phrases.
  • Short Pauses: Hear the gaps between sentences where unwanted pumping becomes most noticeable.
  • Long Pauses: Check that the music returns during real breaks when narration has stopped.
  • Start and End: Notice whether opening and closing sentences behave differently from others.

For longer recordings with many pauses, the Silence Detection guide explains how to find and review silent sections before making cuts. A longer fade duration can reduce pumping by preventing music from rising during short pauses.

Part 5. Correct Individual Sections Manually

Some sections need manual control when audio ducking cannot match intent. Look at the table below for moments that need manual adjustments:

SituationWhat to Do Instead
A Musical AccentLift the music for a brief drum hit or musical swell
A Long Silent BreakRaise the music beyond the automatic recovery to fill the space
A Call to ActionLower the music further so the closing message remains clear
A Track That Changes IntensityAdd keyframes across louder sections to maintain a balanced mix
An Emotional MomentLet the music rise where appropriate without masking important speech

Manual changes can support ducking when certain sections need more precise control. Keep these adjustments limited so future ducking changes remain easier to manage.

Part 6. Review the Exported Audio

Review exported audio because editor playback may hide problems within your mix. Check whether automatic ducking keeps voice clear and music balanced after export.

Listen on 2 Different Systems

Headphones reveal fine details, while small speakers expose common audio problems. Phone speakers flatten track differences, making balanced mixes sound too close. Most of your audience will hear the second version through small speakers.

Check 4 Things While It Plays

Confirm every word stays clear and music never disappears from the mix. Check that no volume change arrives with an abrupt or harsh shift. Then check overall loudness, since balanced mixes can remain too quiet.

Conclusion

A balanced mix starts with clear voice levels and controlled background music. Audio ducking then helps manage volume changes while keeping speech easy to hear. Filmora provides useful controls for shaping how music responds during spoken sections. Review the exported audio before publishing to catch volume changes or balance issues.


Carl Tu
We will be happy to hear your thoughts

      Leave a reply

      XiaomiToday
      Logo